FTP 101: How to upload and manage files on your web server

This page tells you what you need to know to upload files to your web server and mange them using FTP, which stands for File Transfer Protocol, in case you wonder. More specifically, we’ll show you how to upload your file or zip file onto your web server.
1. You need an FTP client
Your web hosting account may come with an FTP tool that runs in a web browser window. If that works for you, fine. But the odds are you will hit the limits of that tool within the first 5 minutes of you trying to use it. So you might as well get yourself a real FTP client.
It’s called an FTP client, because there’s a server and a client. The server is your web server (which includes an FTP server). The client is a piece of software you will install on your computer. The client will then connect to the server and tell him to do what you need it to do.
Although you might never have heard of them, there are many FTP clients available. A good free option for Mac, Windows and Linux is Filezilla. We’ll use this in our example.
There are paid tools which look much better. On Mac OS X we like to use Yummy FTP lite (Free Trial!) or Transmit.
So make your choice, download and install an FTP client on your computer.
2. Connect to your server
Your web host will have given you:
- an FTP hostname
- an FTP username
- an FTP password
- sometimes an FTP port but this is pretty rare
Just copy and paste each of these strings carefully into the "Connection" dialog box of your FTP client. With FileZilla, it looks like this:
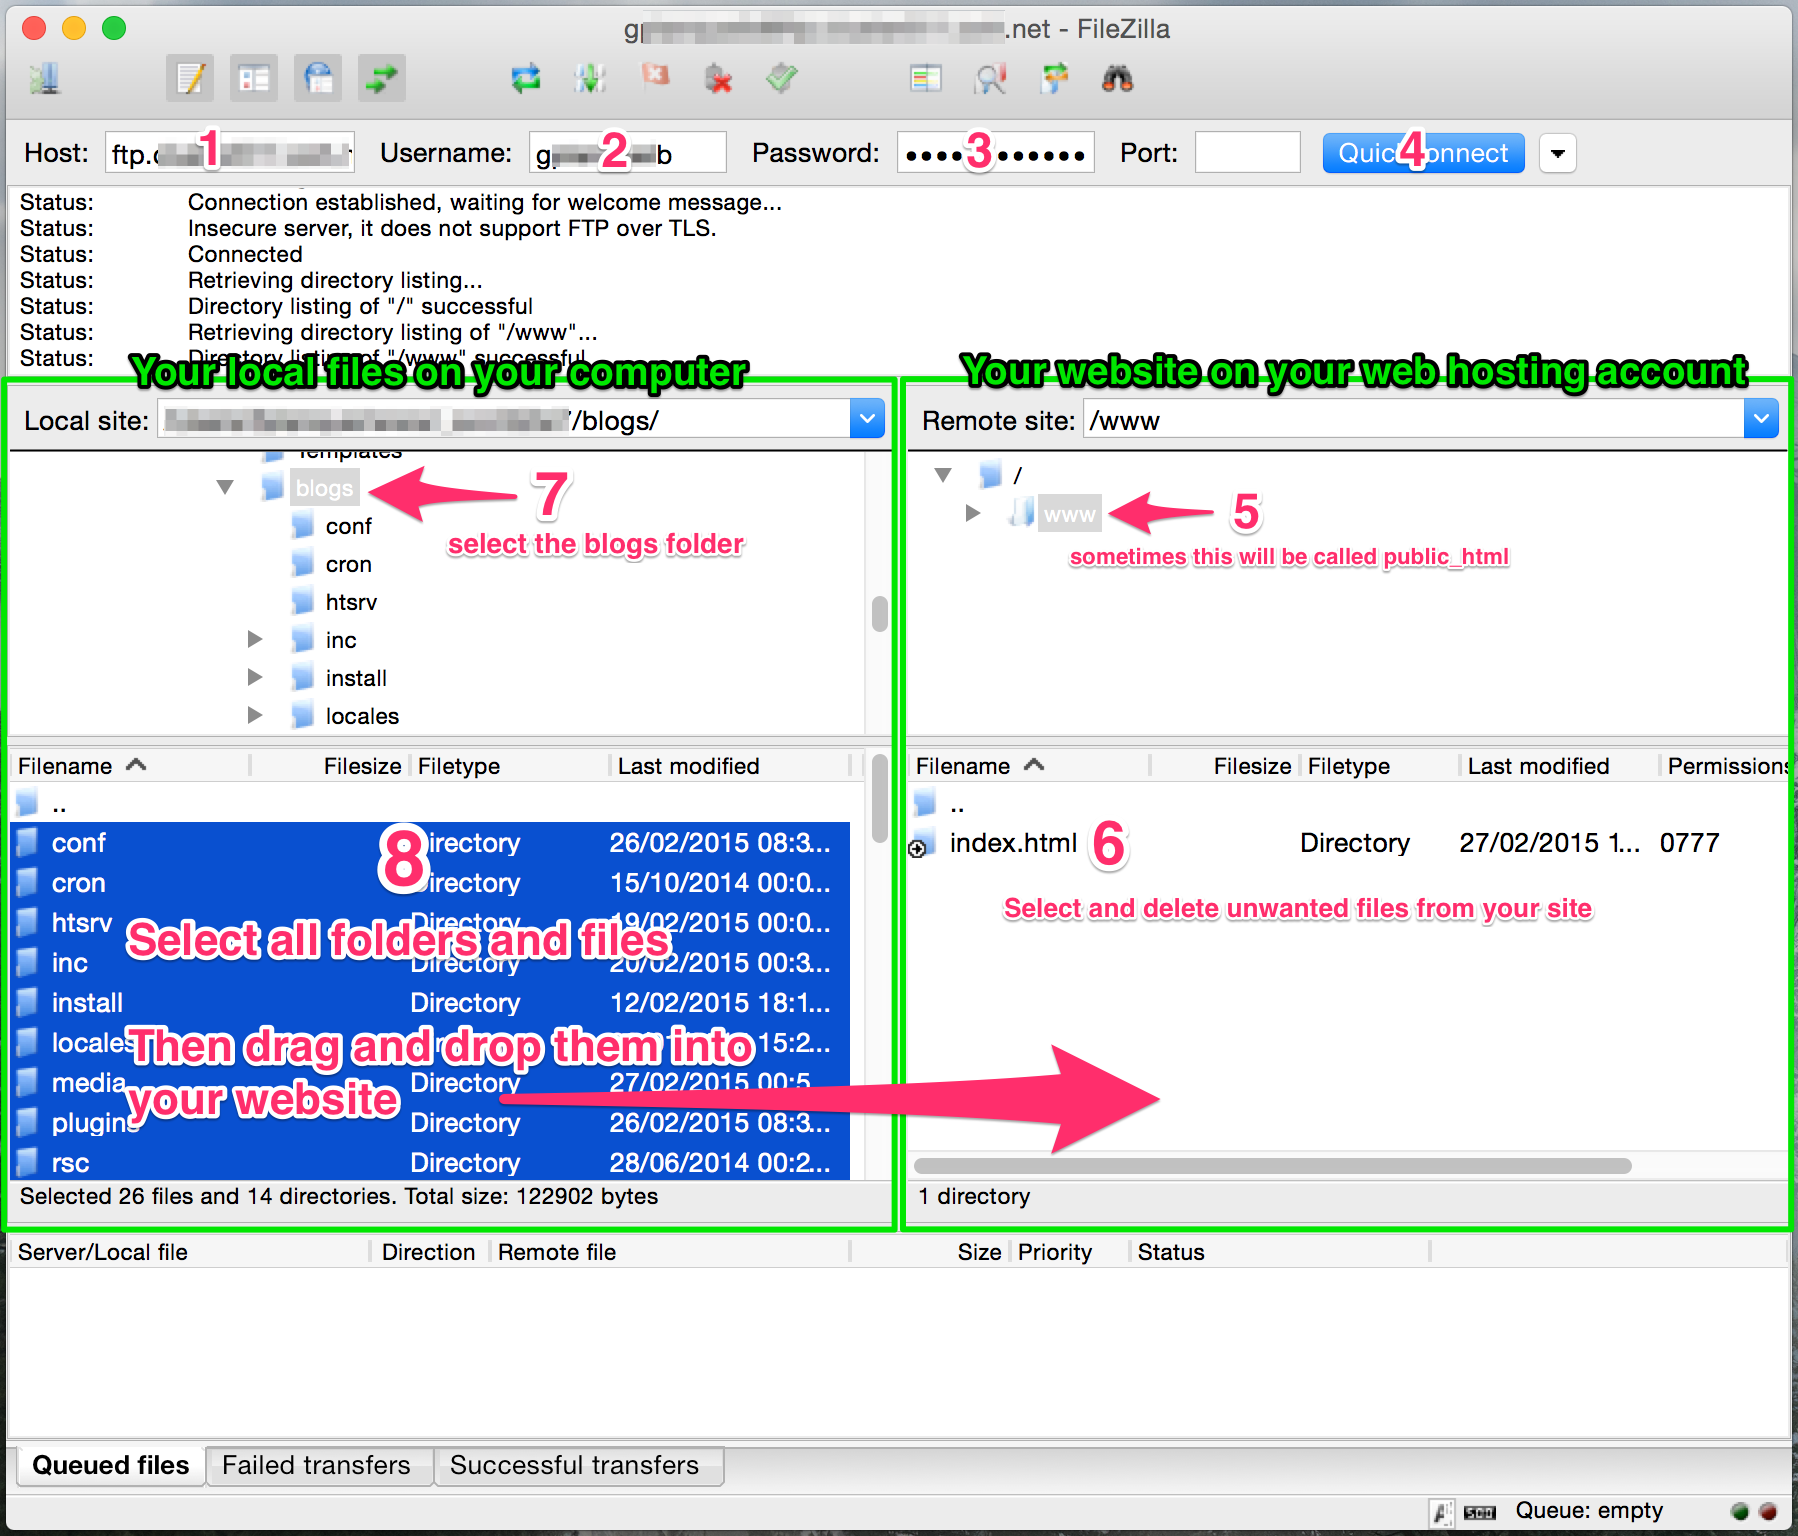 The FileZilla window
- the FTP hostname
- the FTP username
- the FTP password
Once you’ve entered the info, click "Connect" or "Quickconnect" as Filezilla calls it (4).
Note: you can save all this info in an address book if you frequently need to connect to different FTP servers, but this is beyond the scope of this guide.
3. Get acquainted with the interface
There is a best practice among FTP client to present your local files (your computer) on the left and remote files (what on your server) on the right.
You can see this on the screenshot of FileZilla above.
On each size FileZilla shows you 2 panes: you have a directory structure on top and a list of files below. You can use the directory structure to navigate your hard drive and find the folder you’re interested in. Once you select a folder you can see its contents in the pane below.
Yummy FTP has a slightly different view but it boils down to the same concepts:
 The Yummy FTP Lite window
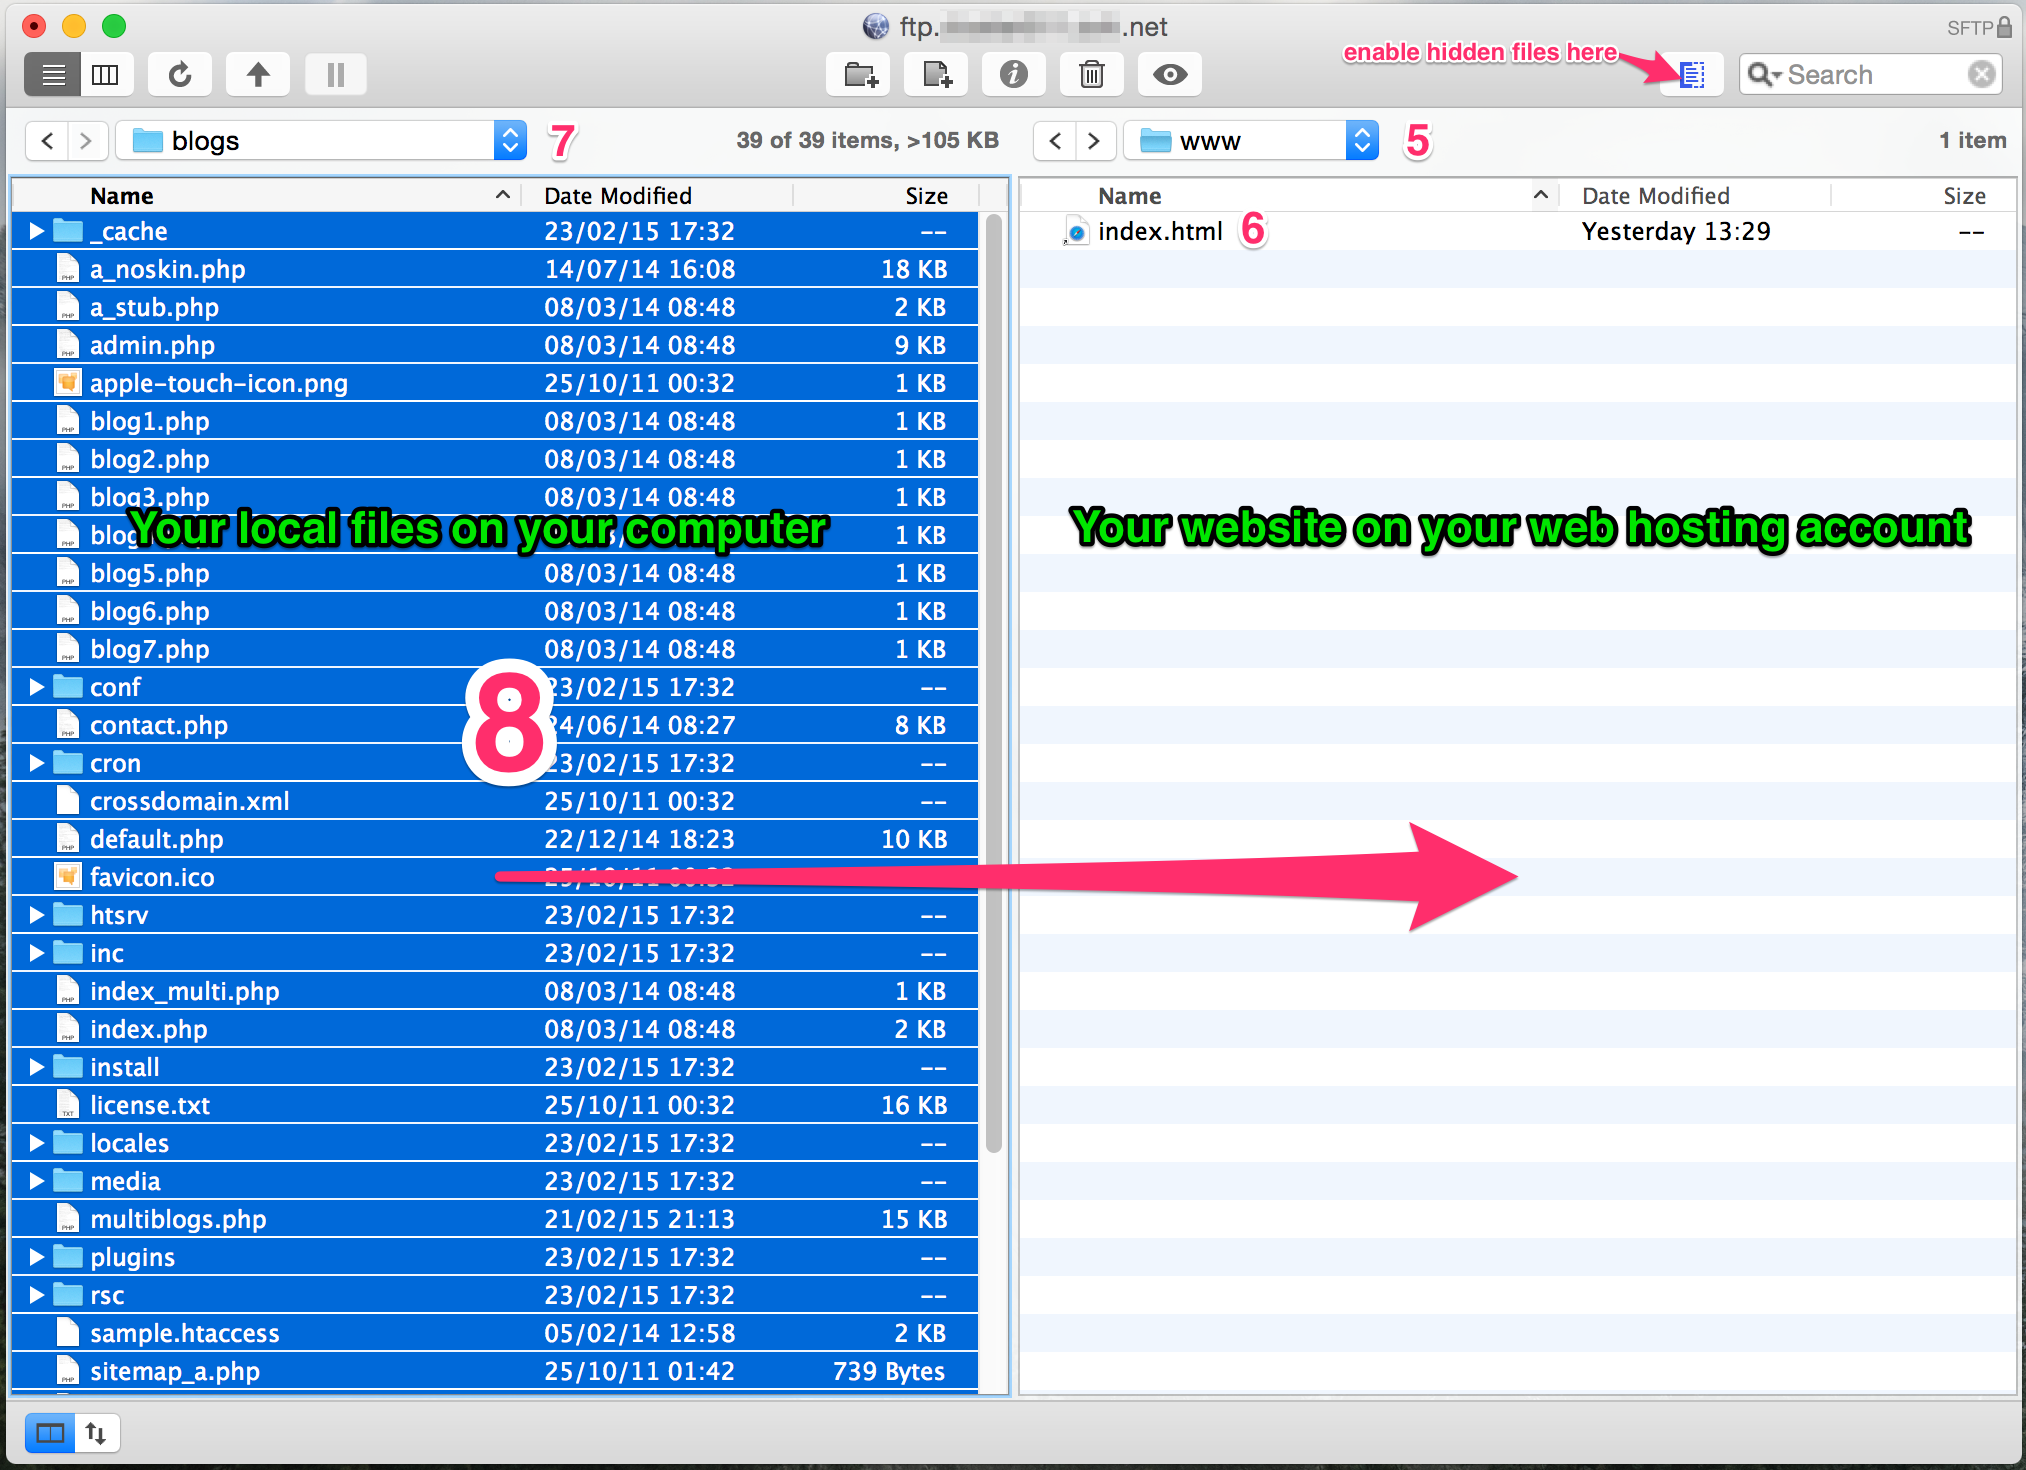
4. Start by finding the root of your website
On the right side you see your web hosting account. Note that by default you are connected to the root of your account which is not the same as the root of your website.
Your website actually lives in a folder that is typically called www or public_html. If you see both, one is an alias of the other, so you can just go with www.
Select that folder (step 5 on the screenshot) to see its contents.
Inside of the www folder you will probably see files that have been placed there by your web host. Most of the time you will see a file called index.html (marked 6 on the screenshot). This is typically the file that displays "This site is under construction" until you put something else there.
5. Clean up
We recommend you start by deleting the index.html file as well as any other file that may be inside of your web root (the www folder). Do NOT touch the files outside of www.
In FileZilla you can delete a file by selecting it and pressing the Delete key. You can also select it and then right-click on it and select "Delete" from the contextual menu.
IMPORTANT: we also recommend you enable "show hidden files" in your FTP client (it it’s not enabled by default) and you delete the .htaccess file that is pre-installed on your web hosting account. This will ensure that digitalwurl.com can install its own.
6. Upload your file to your server
Now, on the left side, find the digitalwurl.com folder on your hard drive.
On most modern computers you will need to start by going into the directory /Users/ in order to find your files.
Once you have found your digitalwurl.com folder, go into the blogs sub-folder. This is what you wan tot upload to your website. You should see the contents of the blogs folder which should be similar to:
- conf
- cron
- htsrv
- inc
- install – Note: this is where the install script is (you’ll call it later)
- locales
- etc.
Select all these folder and files on the left pane. Then drag and drop them into the right pane!
Now just look at FileZilla doing the work of moving all these folders and files recursively onto your website. digitalwurl.com is made of almost 2000 files. It should take between 30 seconds and 10 minutes to upload them all, depending on the speed of your internet connection.
Pay attention if there are errors though. This probably means your internet connection is not very good, or your web host is overloaded. In FileZilla there is a "Failed transfers" at the bottom. If you see failed transfers in there, digitalwurl.com won’t be working. You need to restart the failed transfers. If you have a doubt, you can also re-upload everything (by overwriting the files that are already on the server).
Tip: if you keep having errors, try this operation outside of the peak hours. Late a night or very early in the morning might work best.
7. Extra credit
You may never need this , but notice that on the remote files pane there is a column called permissions where there is a code similar to 0777 or 0755 for each file. These are the UNIX file permissions. If you run into file permission issues later, this is where you need to look.
